Access the Manage Delivery Areas page from the side navigation menu.

Once you’re on the page, click Add new delivery area. A new window will open where you can define the delivery area.
The four buttons in the top-left corner are:
Pen tool - Use the pen tool to map out the surface of the delivery area in hexagons. This allows bucketing data in hexagons, which simplifies performing analysis in later stages of using the platform.
Eraser tool - Use it to remove parts of the delivery area you’re unsatisfied with.
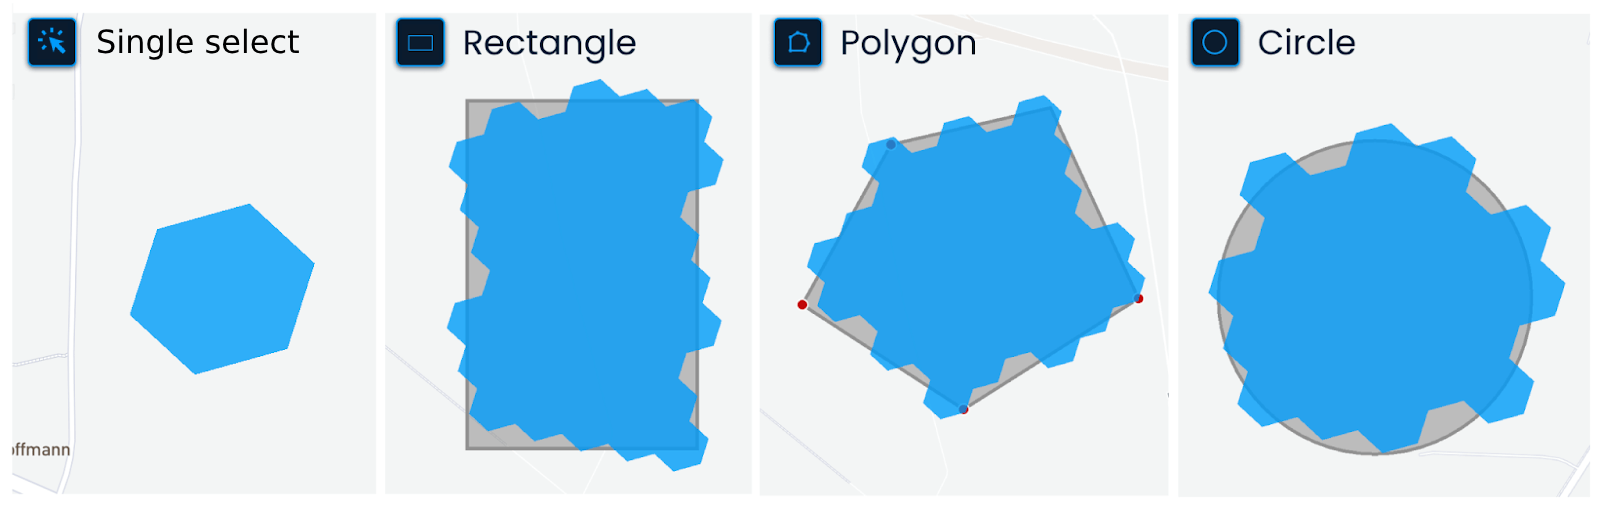
Selection type - Use it to change the type of selection for the Pen and Eraser tool.
Single select - Add or remove one hexagon at a time.
Rectangle - Add or remove hexagons within a rectangle shape. When using the rectangle selection, click on the map and move the cursor across the desired area. Click again to complete the selection, and hexagons will be added or removed from the selected area.
Polygon - Add or remove hexagons within a specific irregular shape by defining a series of connected points.
When using the polygon selection, click on the map to create a starting point. Click again to add more points, making the desired shape. You can close the shape by connecting the last and first points, double-clicking, or pressing Enter on the keyboard.
Circle - Add or remove hexagons within a circular shape.
Click on the map to start the selection, and then move the cursor until the circle covers the desired area. Click again to complete the selection, and hexagons will be added or removed from the selected area.
Hexagon size - Adjust the size of hexagons for the Pen and Eraser tool by clicking the up or down arrow.

Drag across the map until you find the city you’re interested in. To zoom in on a smaller area, use the touchpad or mouse or hold Shift and drag across.
Once you’ve reached the desired region, choose the selection type and map out the area. In the top right corner, you’ll see the size of the delivery area in km² and the number of hexagons used.
Once you’re done, click Next.
After you click Next, the map automatically zooms in on the delivery area you’ve drawn.
You can still adjust the view if needed, for example, by zooming out.
This view will be used as the default map position whenever the delivery area is loaded elsewhere in the platform.
Once you’re happy with how it looks, click Next to continue.
Enter a name for the new delivery area and click Next.
Select which distance types will be available for analysis in this delivery area and set their ranges.
The options are:
Fixed distance
Walking distance
Driving distance
To activate or deactivate a distance type, click its radio button.
Once a distance type is activated, you can set its range, i.e., what the isochrone will measure. You define both inner and outer distances at the same time using the draggable control.
The options are:
Fixed distance:
200 & 400 m
250 & 500 m
300 & 600 m
400 & 800 m
500 & 1000 m
Walking distance:
2 & 4 min
3 & 6 min
4 & 8 min
5 & 10 min
Driving distance:
1 & 2 min
2 & 4 min
3 & 6 min
Click Save to finalize the new delivery area.